Thursday, January 30, 2014

Red Hearts


With Valentine’s Day only a couple of weeks away it’s time to engage into hearts crocheting!

The hearts that I’m making are about 3.5 inches. I use size 4 (1.25 mm) hook and acrylic crochet thread. The pattern is my own. It was one of the first crochet items that I ever designed. That was two years ago.

I made quite a bunch of these hearts back then, but I don’t have any left.

The hearts are quick to make and very festive. I think they will make lovely Valentine’s Day gifts for my sons’ pre-school teachers and classmates.


crochet heart ornament symbol chart


I'm linking this post to 
Link Your Stuff @ Annamarie's Haakblog

Monday, January 27, 2014

Small Pink Doily, My Free Pattern


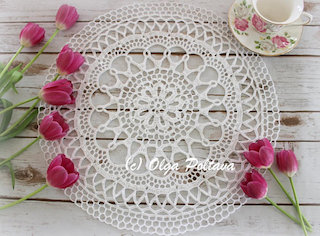
I’m trying my hand at designing doilies again. After all, that's my biggest crochet passion, which started this blog. 


Here is what I came up with!


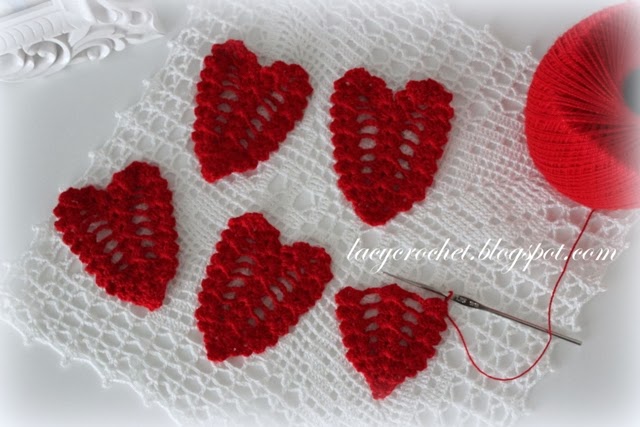
This doily measures 7 inches (almost 18 cm) in diameter. I used pink crochet cotton thread size 10, and steel hook size 4 (1.25 mm).

I didn’t have anyone to test the pattern, so if you see any mistakes or something doesn’t make sense, please let me know. Thank you.


Ch 12, join with sl st into ring.


Round 1: Ch 3, dc in ring, *ch 2, 2 dc in ring* 9 times, ch 2, join with sl st into 3rd ch of beg ch-3.


Round 2: Sl st to next ch-2 space, ch 3, 2 dc in same space, *ch 3, 3 dc in next ch-2 space* 9 times, ch 3, join with sl st into 3rd ch of beg ch-3.


Round 3: Sl st to next ch-3 space, (ch 3, dc, ch 2, 2dc) all in same space, *ch 2, (2 dc, ch 2, 2 dc) all in next ch-3 space* 9 times, ch 2, join with sl st into 3rd ch of beg ch-3.


Round 4: Sl st to next ch-2 space, (ch 3, 2 dc) in same space, *ch 3, 3 dc in next ch-2 space* 19 times, ch 3, join with sl st into 3rd ch of beg ch-3.


Round 5: Ch 3, dc in same space, ch 2, skip next dc, 2 dc in next dc, *ch 7, skip next 3 dc, 2 dc in next dc, ch 2, skip next dc, 2 dc in next dc* 9 times, ch 7, join with sl st into 3rd ch of beg ch-3.


Round 6: Ch 3, dc in same space, dc in next dc, ch 2, dc in next ch-2 space, ch 2, dc in next dc, 2 dc in next dc, *ch 5, 2 dc in next dc, dc in next dc, ch 2, dc in next ch-2 space, ch 2, dc in next dc, 2 dc in next dc* 9 times, ch 5, join with sl st into 3rd ch of beg ch-3.


Round 7: Ch 3, dc in same space, dc in next 2 dc, ch 2, (dc, ch 2, dc) all in next dc, ch 2, dc in next 2 dc, 2 dc in next dc, *ch 3, 2 dc in next dc, dc in next 2 dc, ch 2, (dc, ch 2, dc) all in next dc, ch 2, dc in next 2 dc, 2 dc in next dc* 9 times, ch 3, join with sl st into 3rd ch of beg ch-3.


Round 8: Ch 3, dc in same space, dc in next 3 dc, ch 2, dc in next dc, ch 3, dc in next dc, ch 2, dc in next 3 dc, 2 dc in next dc, *ch 1, 2 dc in next dc, dc in next 3 dc, ch 2, dc in next dc, ch 3, dc in next dc, ch 2, dc in next 3 dc, 2 dc in next dc* 9 times, ch 1, join with sl st into 3rd ch of beg ch-3.


Round 9: ch 2, dc4tog over next 4 dc, ch 6, skip next ch-2, 3 dc in next ch-3, ch 6, dc5tog over next 5 dc, *ch 5, dc5tog over next 5 dc, ch 6, skip next ch-2, 3 dc in next ch-3, ch 6, dc5tog over next 5 dc* 9 times, ch 5, join with sl st to first dc4tog.


Round 10: ch 5, 2 dc in next dc, dc in next dc, 2 dc in next dc, ch 5, sc in next dc5tog, *ch 6, sc in next dc5tog, ch 5, 2 dc in next dc, dc in next dc, 2 dc in next dc, ch 5, sc in next dc5tog* 9 times, ch 5, join with sl st to 1st ch of beg ch-5.

Fasten off. Block doily.

Wednesday, January 22, 2014

Giving Up!


This was supposed to be my “gorgeous lacy red skirt”, but I totally failed at it!

After over two months of crocheting, writing down each round, unraveling, crocheting again, unraveling again, going crazy about it... it’s time to give up! 

Oh what a waste of time and energy it was. But it’s not even that that makes me feel sad. It’s the feeling of failure. I really wanted this skirt to happen…

The problem is I couldn’t get the increases right. My skirt would turn out either too wide, or too slim, or have some other strange shape. 

It looks okay in the picture, but it looks totally weird when I try it on. So the final verdict is to unravel it all!


Monday, January 20, 2014

Do You Know Your Wool?


I certainly know my wool now as I just finished Craftsy’s free online class named Know Your Wool. It was not only an educating but highly enjoyable experience.

Once I took my children to their pre-schools, I would make myself a cup of tea, equip myself with a notebook and a pen (yes, I’m a good student and I took notes) and enjoy watching Deborah Robson, a textile specialist, who instructed this video class. I paused the video when I needed to take notes and to find (and bookmark) the recommended resources on the Internet.


It’s incredible how many things about wool, its productions, and deferent breeds I have learned. Before I watched this class, the word “crimp” was not even in my vocabulary (I had to look up its meaning/translation in a dictionary).

I’ve learned how to choose and test the right kind of wool for a particular project. Another great thing that I’ve learned is how to find a good quality wool yarns made in the USA (which is important to me because I want to support wool breeders of my country first) as well as around the globe.

I want to thank Craftsy and Deborah Robson for this wonderful class, and I would highly recommend it to other crocheters and especially knitters.

Know Your Wool Online Class is available for free. All you need is an e-mail or a Facebook account to register. Once registered you can watch the videos at your own pace and re-watch them as many times as you like.


Free Online Know Your Wool Class

Craftsy Free Classes


Disclosure: The opinions expressed in this post are entirely my own.  Craftsy is one of my affiliates, and I might get a small commission from your registration for their online classes.

Thursday, January 16, 2014

Romantic Doily with Hearts


It’s been only a few days since I finally packed away all my Christmas decorations. It is still a bit too early to think about spring holidays (though the weather here in California is already spring-like with the birds singing their cheerful songs and some of the trees starting to bloom!), but luckily there exists such wonderful winter holiday as Valentine's Day.


It used to be that whenever I thought about Valentine’s Day chocolate and red roses would come to my mind; but nowadays I associate Valentine’s Day with dainty hearts and cherubs.

When I came across the pattern for this big doily several weeks ago, I thought it would make a perfect Valentine’s Day crochet project.


The free pattern is from Coats Crafts, and it’s a symbol chart using UK crochet terminology. Actually, there are two patterns, and I made the smaller one.  Click here for the pattern.


I'm linking this post to 
Link Your Stuff @ Annamarie's Haakblog
Home Sweet Home Friday @The Charm of Home,
Show and Tell Friday @ My Romantic Home,


Sunday, January 12, 2014

Crochet Leaf Bookmark, Free Pattern


I used size 10 crochet cotton thread and size 5 Boye crochet steel hook.

Row 1: ch 5, (tr, ch 1, tr, ch 1, 2 tr) all in 5th (the last one) chain from hook.


Row 2: ch 4 (counts as tr here and in each following row), turn; tr in same space, 2 tr in next tr, ch 1, tr in next tr, ch 1, 2 tr in each of next 2 tr.


Row 3: ch 4, turn; 2 tr in next tr, tr in next 2 tr, ch 1, (2 tr, ch 1, tr, ch 1, 2 tr) all in next tr, ch 1, tr in next 2 tr, 2 tr in next tr, tr in last tr.


Row 4: ch 4, turn; tr in next 4 tr, ch 1, 2 tr in each of next 2 tr, ch 1, tr in next tr, ch 1, 2 tr in each of next 2 tr, ch 1, tr in next 5 tr.


Row 5: ch 3, turn; tr4tog over next 4 tr, ch 1, tr in next tr, 2 tr in next tr, tr in next 2 tr, ch 1, (2 tr, ch 1, tr, ch 1, 2 tr) all in next tr, ch 1, tr in next 2 tr, 2 tr in next tr, tr in next tr, ch 1, tr5tog over next 5tr.


Row 6: ch 1, turn, sl st to next tr; ch 4,  tr in next 4 tr, ch 1, 2 tr in each of next 2 tr, ch 1, tr in next tr, ch 1, 2 tr in each of next 2 tr, ch 1, tr in next 5 tr.


Rows 7 – 16: repeat Rows 5 – 6.


Row 17: ch 3, turn; tr4tog over next 4 tr, ch 1, tr in next tr, 2 tr in next tr, tr in next 2 tr, ch 1, 3 tr in next tr, ch 1, tr in next 2 tr, 2 tr in next tr, tr in next tr, ch 1, tr5tog over next 5tr.


Row 18: ch 1, turn, sl st to next tr; ch 4, tr in next 4 tr, ch 1, tr in next tr, 2 tr in next tr, tr in next tr, ch 1, tr in next 5 tr.


Row 19: ch 3, turn; tr4tog over next 4 tr, ch 2, tr in next 4 tr, ch 2, tr5tog over next 5 tr.


Row 20: ch 1, turn, sl st to next tr; ch 3, tr3tog over next 3 tr.

Fasten off. Block and stiffen the bookmark.  


UPDATE: A video tutorial for this bookmark is now available on YouTube! 


More bookmark patterns from my shop:


Wednesday, January 8, 2014

Lacy Infinity Scarf Tutorial


The Lacy Infinity Scarf pattern is the most popular post on my blog, and I get tons of compliments as well as questions about it both in the comments and in e-mails.

I decided to make a tutorial for those of you who need extra help with this project. I hope it will be helpful.

For the demonstrative purposes I use red yarn. I think the pictures are pretty much self-explanatory, but I will make some comments about the ends of rows (that’s the trickiest part). 


Row 1


Row 2


When you get to the end of row 2, the pattern reads: dc in last dc.

Note that in reality it's not a dc at all, it's actually a turning chain (but as some of you might know, turning chains oftentimes "act" as double crochets). 


Row 3


When you have made the last shell of row 3, you have a turning ch-6 left.


Here make a dc into 2nd ch (counting from bottom) of the turning ch-6.


Then you simply repeat rows 2 and 3.

When you get to the end of row 2, once again you are not making a dc into an actual dc, but into a turning ch-3. 

In order to keep your edges straight, make that last dc not into 3rd, but into 2nd ch of turning ch-3 (this is a little trick that I came up on my own).


In the picture below I show you what a difference it can make for your edge:


Another question that I get quite often is how to make the twist.

Here is how:

Lay your scarf on a flat surface.


Flip one end to the other side to form a twist. Maintaining that twist, stitch the ends together. 


My other scarf and cowl patterns:


Monday, January 6, 2014

Crochet Blocks Toddler Beanie, Free Pattern


The little fellow in the pictures is my younger son Niko, and he is wearing a beanie hat that I made for him. What’s cool about this hat is that it’s entirely recycled!


Over a year ago I bought a skein of Country yarn by Naturally Caron (75% acrylic, 25% merino wool), and I used it to make my son a Bear Beanie shown below. But my son grew out of it, so I unraveled it and made a new hat.


Here in California winters are warm (especially this year), so the open block stitch worked well for this project. If you use a girly color yarn and add a flower (see free flower patterns here), you’ll have a cute beanie hat for a toddler girl.


Country yarn by NaturallyCaron.com; color Deep Taupe (#15), 1 skein (185 yards)


Crochet hook US size G (4.25 mm)


Ch 6, join in ring.


Round 1: ch 3, 15 dc in ring; join with sl st into 3rd ch of beginning ch-3.


Round 2: ch 1, sc in same space, ch 3, *skip next dc, sc in next dc, ch 3* around; join with sl st to beginning sc.


Round 3: sl st in next ch-3 space, ch 3, (dc, ch 1, 2 dc) all in same space, ch 1, *(2dc, ch 1, 2 dc) all in next ch-3 space, ch 1* around; join with sl st into 3rd ch of beginning ch-3.


Round 4: sl st to next ch-1 space, ch 1, sc in same space, ch 3, *sc in next ch-1 space, ch 3* around; join with sl st to beginning sc.

Round 5: sl st in next ch-3 space, ch 3, 2 dc in same space, ch 1, *3 dc in next ch-3 space, ch 1* around; join with sl st into 3rd ch of beginning ch-3.


Round 6: sl st to next ch-1 space, ch 1, sc in same space, ch 3, *sc in next ch-1 space, ch 3* around; around; join with sl st to beginning sc.


Round 7: sl st in next ch-3 space, ch 3, 3 dc in same space, ch 1, *4 dc in next ch-3 space, ch 1* around; join with sl st into 3rd ch of beginning ch-3.


Round 8: sl st to next ch-1 space, ch 1, sc in same space, ch 4, *sc in next ch-1 space, ch 4* around; around; join with sl st to beginning sc.


Round 9: sl st in next ch-4 space, ch 3, 4 dc in same space, ch 1, *5 dc in next ch-4 space, ch 1* around; join with sl st into 3rd ch of beginning ch-3.


Repeat Rounds 8-9.

Fasten off. 

Thursday, January 2, 2014

Crochet Baby Booties, Size 0-6 Months, Free Pattern


Before my holiday break, I promised my readers a pattern for baby booties. It was fun to work on these cutties (working on baby items is always fun for me), and surprisingly I didn’t do much unraveling and the design/pattern came out quite easely.

For the buttom part of the booties, I used single and double crochets. But for the upper part I wanted something fancier, so I used shells (2 dc, ch 2, 2 dc) all in same space. The same shells were used in Angels Wings Pinafore Newborn Dress, and I also used those same shells in my Newborn Hat to Match the Dress. So now I have an entire matching gift set of a dress, a hat, and a pair of booties.

You might remember me mentioning that a friend of mine was expecting a baby, and I hoped to give her this baby set. Well, my friend safely delivered her beautiful baby BOY! That’s wonderful news, but now I need to figure out something cute and useful to crochet for him.


Please, DO NOT repost this or any other of my patterns on other websites or blogs (however, you can use ONE picture with a LINK to the pattern on my blog). Please respect the work and time I put into creating/writing my patterns. Thank you.


Materials:


Light Worsted 100% acrylic yarn


Crochet hook US size D (note this is not the recommended size for the yarn, but usually I prefer smaller size hooks, so that my stitches come out tighter)


Two pieces of ribbon, about 20 inches each


Safety pin

Special stitches:

Shell: (2dc, ch 2, 2 dc) all in same space

dc8tog: make 8 unfinished dc, then finish them all together


Round 1: ch 17, 4 dc in 3rd ch form hook, 13 dc across, 5 dc in last ch, 13 dc across working in original chain. Join with sl st.


Round 2: ch 3, dc in same space, 2 dc in each of next 4 dc, 13 dc, 2 dc in each of next 5 dc, 13 dc. Join with sl st.


Round 3: ch 1, sc in same st, sc in each st around. Join with sl st.


Round 4: ch 3, dc in back loop only in each sc around. Join with sl st.


Round 5: ch 3, dc in next 22 dc, {dc2tog over next 2 dc} 5 times, dc in next 13 dc. Join with sl st. Fasten off, wave in end.


Front of the bootie:


Half-round 6: On the front of the bootie locate the central stitch (it’s the 3rd dc2tog), count 8 stitches to the right, attach yarn in 8th st; ch 2, dc in next st, {dc2tog over next 2 st} 8 times. Turn.


Half-round 7: dc8tog over next 8 st. Turn.


Round 8: ch 3, (dc, ch 2, 2dc) all in same space, skip next half-round, shell in end of next half-round, *skip next 3 dc, shell in next dc* 6 times, shell in end of next half-round. Join with sl st to beginning shell.


Rounds 9-11: sl st to next ch-2, ch 3, (dc, ch 2, 2dc) all in same space, shell over next shell around. Join with sl st to beginning shell.


Fasten off.


Pin the safety pin into one end of the ribbon. Pass it through the open spaces in the first round of shells. Tie a bow. Trim the ribbon ends if needed.


More baby patterns from my shop: