

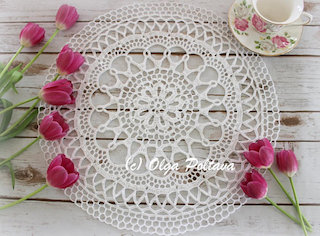
Very easy doily pattern. And yet, I managed to make a mistake!
I noticed it just now, looking at the photo. I don't think I would've noticed it from the doily itself.
There are only eleven rounds, and it took me about forty minutes to make the doily this morning.
I used size ten cotton thread and a 1.25 mm steel hook. My doily came out ten inches in diameter.

Rnd 1: Ch 7, sl st in first st to form a ring. Ch 1, 12 sc in ring.
Rnd 2: Ch 5 (for a dc and ch 2), dc in next st, * ch 2, dc in next st, repeat from * around, join last ch 2 to third st of first ch 5.
Rnd 3: Ch 7 (for a dc and ch 4), dc in dc, * ch 4, dc in next dc, repeat from * around, joining last ch 4 to third st of first ch 7.
Rnd 4: Ch 9 (for a dc and ch 6), dc in dc, ch 6, dc in next dc, repeat from * around, joining last ch 6 to third st of first ch 9.
Rnd 5: Ch 16 (for a dc and ch 13), dc in dc, * ch 13, dc in next dc, repeat from * around, and join last ch 13 to third st of first ch 16.

End 6: Sl st in each of first 2 sts, ch 3 (for first dc), dc in each of next 3 sts, * ch 7, dc in each of next 4 sts of same lp, ch 3, sk 2 sts of next lp, dc in each of next 4 sts, repeat from * around, end with a ch 2 and hdc in top of first ch 3 made. This brings thread in position to begin next rnd.
Rnd 7: Ch 5, * (4 dc, ch 7, 4 dc) in lp between dc groups below, ch 2, dc over ch 3 below, ch 2, repeat from * around, end with a ch 2, sl st in third ch of eh 5 first made.
Note: Thread over hook 4 times for a tr tr in next round.
Rnd 8: Ch 9, * 5 dc over ch 7 lp, ch 3, (tr tr, ch 9, tr tr) in dc, ch 3, repeat from * around, end with a ch 3, tr tr at base of ch 9 first made, ch 9, sl st in 6th ch of ch 9 first made.
Rnd 9: Sl st in each of 3 sts and first dc of 5 dc group, * sc in each of next 3 dc, ch 4, dc in sccond st of ch 9 below, (ch 1, dc in next st) 6 times, ch 4, sk first dc, repeat from * around, end with a ch 4, sl st in first sc made.
Rnd 10: Sl st to middle of next sc, ch 4, * dc over ch 1 sp between dcs, (ch 5, dc over next sp) 5 times, ch 4, sc in middle sc of 3 sc group, ch 4, repeat from * around, join at beginning.
Rnd 11: Sl st to center of lp between 2 dcs, ch 11 (for a dc and a ch 8), * dc in each ch 5 sp with ch 8 between, ch 2 between each scallop, repeat from * around, join and fasten off. Block and shape.


.png)


It looks great! Thank you for sharing the pattern.
ReplyDeleteIt's beautiful!! Thanks for sharing!
ReplyDeleteI'm always so impressed with your creativity - the vintage doily is so very delicate. I love it - thanks so much for sharing your work and the pattern. I put everything you make on a back burner to make one day in the future - my list just gets longer and longer. I'm NEVER going to live long enough to finish my bucket list. :)
ReplyDeleteAhh, thank you for such sweet comment :)
DeleteIt's a gloomy, rainy and windy day here, but your kind words really make it brighter. Thank you!
Sweet little doily! Sometimes that's all you want to do is a small little something that gives you the feeling of accomplishment. It's perfect and would make a great last-minute gift! Thanks for the pattern.
ReplyDeleteIt is beautiful.
ReplyDeleteОльга, красивая салфетка! С уважением!
ReplyDeletebeautiful doily!
ReplyDeleteLook, I've already made one myself: http://antiplictis.blogspot.ro/2017/03/de-la-lume-adunate-si-apoi-crosetate.html
ReplyDeleteYour doily is lovely! <3
DeleteQUE LINDO! VOU FAZER. OBRIGADA PELO PADRÃO.
ReplyDeleteThis comment has been removed by the author.
ReplyDeleteBeautifull, I think I'll make a dreamcatcher.🤔👍
ReplyDeleteI am making a doily board for my teen grand daughter for her room. I needed a few small doilies to fill in the corners and this is going to be perfect. I"m going to make it right now. Thank you so much for sharing.
ReplyDelete